Wednesday, August 25, 2010

Completely Passive, Non-Recirculating Hydroponic Systems : Some Tips for Large Plants

On yesterday's post I talked about the existence of completely passive, non-recirculating hydroponic systems and how they can be successfully used for the growth of almost any hydroponic crop you can imagine. Following on this post's idea today I want to share with you some tips to use this type of system with larger plants so that you can effectively setup your own hydroponic passive farm with the least amount of effort and chance of failure. On today's post I will talk about the media and system characteristics for the raising of large plants, particularly plants like tomatoes, cucumbers and bell peppers which require large amounts of oxygen, nutrients and solid media support.

If you read the previous post you might remember that when using large plants -like the ones mentioned above - the best thing is to use a media filled container in which the nutrient solution is first close to the surface and then slowly gets used and evaporates from the nutrient solution. However it is also important here to say that there are some specific requirements for the media and some important changes that can be made to guarantee that success will be much more likely to happen.

The solid media used is better divided in two, the first media is a highly absorbent, capillary efficient media (like rice husk combined with sand 1:1) which is put in a small cup or container while the second media is a non-absorbent very capillary deficient media like gravel which is used to occupy the rest of the available space. Other coarse media can also be used to fill the rest of the container like vermiculite or other types of rocks. The important thing here is that the whole media must NOT be efficient at capillary absorption because this will make the whole media wet all the time and it will drown the roots since the "air space" will be non-existent.
-
-
You can follow the diagram above to build a system for a large plant. Note that the container for a large cucumber or tomato plant must be at least 5 gallons and solution needs to be added at a rate of about 1 gallon a month through the crops full life. Note that inserting a small PVC pipe to control volume within the container is always a good idea since you don't want to put so much solution to drown the roots and make the plant die. Mature tomato plants require a space of at least 50cm of air roots when they are older for their proper development so make sure the container you use is about 70-100 cm tall when you build your system.

Hopefully with this advice you will be able to start your first passive large-plant hydroponic garden without using any electricity. Also remember that this setup requires absolutely no EC or pH adjustments since once added the solution won't be able to be modified. This however does not cause any problems since the plants adapt to the solution and pH levels acquired. You can also increase the EC or change the nutrient ratios depending on the plant's stage when you perform the monthly nutrient solution additions to your plant's personal reservoir. Please feel free to leave any comments with your experiences with this technique !

Tuesday, August 24, 2010

Completely Passive, Non-Recirculating Hydroponic Systems : Yes, Its Possible

Generally when we think about growing plants hydroponically we think about complex setups with water pumps, air pumps, artificial lights, environmental control and greenhouses. However, it has been shown through many controlled experiments and experiences that hydroponics can be made in a much less fancy way, so simple in fact that pumps and other such appliances that consume electricity can be effectively and totally eliminated from the growing system without the need to lose a significant amount of crop quality or yield. On today's article I want to discuss some of these extremely simple setups and how you too can effectively and efficiently grow a hydroponic crop with low cost and absolutely no usage of electrical power.

Traditionally hydroponic systems - especially in developed countries - have been extremely dependent on electricity to make them work properly. Water pumps are used to carry fresh nutrient solution towards the plants and air pumps are used to keep the nutrient solution saturated with oxygen. However the truth is that such complicated setups are actually NOT necessary for successful hydroponic growth if adequate system design is actually made. People in less developed areas of the world such as South America, China and India have been experimenting with completely passive hydroponic setups to replace the more traditional energy intensive hydroponic growth and they have done tremendous progress to achieve this goal.

Many of you are probably already thinking about all the possible problems this might have. You might be thinking that this might work for small plants - like lettuce and some herbs - but never for nutrient hungry plants such as tomatoes, pumpkins, watermelons, etc. The fact is that these entirely passive non-recirculating systems work for ALL of these plants, providing adequate growing conditions and high yields typical of hydroponic systems. Right now it is not a matter of opinion or discussion if it can be done as MANY studies and controlled experiments already show this is a reality. You can see some clear examples here, here and here.

The questions now becomes, how is this possible and how can you do it ? The answers are pretty simple. Passive hydroponics without any electricity can be done for large or small plants given that the following conditions are met :
  • Enough space for roots is available
  • Enough nutrient solution is available for all the crop's life (or it is replenished)
  • Enough oxygen is available for the plant's roots
If this three conditions are met you will be able to build a passive hydroponic growing system that needs NO air or water pumps to give a good yield. How can you make such a system ? The systems that have given the best results up until now are those that follow a very simple design scheme. The plant is put in an absorbent nutrient media and placed to float or stand just above the initial nutrient solution level. The level of nutrient solution slowly falls down in the beginning (due to evaporation) and then quickly as the plants start to absorb water and nutrients. As the level of nutrient solution lowers the plant roots become exposed to layers of air from which they can absorb oxygen, allowing them to effectively absorb nutrients from the below stagnant solution without those roots dying.

Most people believe that if roots are submerged in an unaearated solution they will die but this is only true if the whole root system is submerged. If a good part of the system is given an "air buffer" from which to absorb oxygen and this space remains humid, the result is a system that can absorb nutrients from the unaerated solution and oxygen from the air buffer zone. This has in fact been shown to work in many cases (you can follow the links mentioned before for some examples).
-
-
For big plants such as cucumbers and tomatoes you would want to use a container filled with solid media to support the whole plant with the initial nutrient level being just a few inches below the surface while for smaller crops a "fixed top" idea might work much better. In the above image you can see both systems and how they evolve as the crops grow. For larger crops you might also want to replenish some solution every month so that the crops can get all the water and minerals they need if the actual container is not large enough to hold all the water the plant would use through its whole life cycle.

Without a doubt passive hydroponic systems like these ones will become extremely important in future world agriculture (especially in developing countries) since they are able to give us many of the wonderful advantages of hydroponics without the problem of complex electronic equipment, water, air pumps or an inherent dependency in the electric grid (which is not available everywhere in rural third world countries). Hopefully this information will also be useful for those looking to establish some passive and effortless hydroponic gardens to have fresh crops year round :o).

Monday, August 23, 2010

Improving Seed Germination : The Science of Seed Priming

When we want to produce large amounts of plants or simply when we want to start our gardens fast and get the most out of our purchases improving seed germination becomes a large priority. One of the largest concerns of world agriculture as well as the home grower is the decrease in germination time and increase in germination percentage since both of these factors can bring great benefits. Some seeds - especially some flowers and herbs - are often quite difficult to germinate and using certain techniques to increase the rate and speed in which they sprout has been the focus of a large amount of scientific research. On today's article I will be discussing the use of priming to decrease germination time, especially what priming is, what types are available and which ones you can use to decrease the germination time of those very difficult seeds.

To understand the concept of priming we first need a good grasp at the general concept of seed germination. A seed is a dormant embryo which carries within it the potential for a new plant's life. The seed is alive, yet has a very slow metabolic rate due to the low mobility of substances within the embryo's cells. This low metabolic rate allows the seed to remain alive, yet survive extremely long periods of time (some seeds can survive even hundreds of years) before actually sprouting into new plants.

Germination - which is the process in which we awaken the embryo - increases seed metabolism and toggles the massive reproduction that causes a new plant to grow. The main mechanism that triggers this process is simply liquid water. When water gets into the embryo and hydrates its cells, it speeds up metabolism and allows the process of cell division and growth to rapidly increase. However it is not always this simple to start this process since several impairments - both chemical and physical - can exist for successful germination.

Priming is simply a process done prior to conventional seed germination which allows the inhibiting mechanism to be broken and the metabolic speed increase to begin. There are several types of priming that can be done. A seed can be submerged in simple water (hydropriming), it can be soaked in a solution of a simple salt (halopriming) or it can be set in a non-ionic solution with high osmotic pressure (osmopriming). It is not entirely well established why one technique might work better than another but certainly some species tend to respond much more efficiently to one or another.
-
-
In general, priming offers the opportunity to almost always germinate seeds at much higher speeds without detrimental effects in germination percentages. For example, a two day treatment of parsley seeds with a PEG 6000 (PolyEthyleneGlycol) solution can reduce germination times substantially, from a few weeks to just a few days. Other seeds such as coriander might also benefit from similar treatments with PEG or with treatments with NaCl solutions. In general if you are looking to test priming on some difficult seeds you own you can try three small experiments to know which one works best for your particular seed variety and germination conditions. Do one experiment in which the seeds are simply soaked in water for 24 hours, another in which seeds are placed in a 200mg/L NaCl solution and another one in which the plants are submerged in a PEG 6000 20% solution, then let the seeds air-dry after the treatments. After comparing the results of these experiments with a control with no priming you will be able to see which priming technique is better for you and most effectively increases your seed germination rates.

To sum it up priming your seeds is a very efficient technique to increase the speed of germination without sacrificing germination rates. This methods are not very useful for seeds such as lettuce or tomato - which germinate easily - but they are invaluable for plants such as parsley, coriander or carrots which are generally much harder to germinate. If you have some seeds that have been giving you a hard time or seem to take ages to germinate then setting up some priming experiments might be the best thing to do.

Friday, August 20, 2010

My Hydroponics Calculator : Features and Objectives

For those of you interested in the preparation of your own hydroponic nutrient solutions, my hydroponic nutrient calculator should prove to be a very useful (hopefully invaluable !) tool to complete this endeavor. Within the following paragraphs I want to talk to you about the main objectives and uses of my calculator as well as some of the confusions that arises when people new to hydroponics and the chemistry of nutrient solutions starts to use it. After reading this you will be able to know precisely what my calculator does, how it can be useful to you and what the calculator simply doesn't do.

My hydroponics nutrient calculator (hydrobuddy, which you can get here) is a tool designed to aid people to prepare their own hydroponic nutrient solutions in a straightforward and easy manner. The idea of the calculator is to make all the mathematical calculations needed to go from a desired formulation composition to a given weigh of a fertilizer salt much easier than how it usually is with excel spreadsheets or manual calculations. Hydrobuddy therefore allows a person to know exactly how the addition of a given salt affects the concentration of a certain number of elements within a hydroponics solution, allowing the user to select and use the salts that precisely fit his/her desired formulation.

The main function of hydrobuddy is to take a given formulation specifying the concentration of all the giving nutrients as ppm and translate it into the necessary weights of salts or fertilizers needed to achieve these concentrations. It is however important here to note that these ppm values have NOTHING to do with the ppm values read by your EC meter. The values an EC meter reads as ppm are TDS or salinity measurements that correspond to the concentration of a sodium chloride solution of equivalent conductivity. This measurement has nothing to do with the ppm values used to specify the concentrations of the different nutrients within a solution.

Hydrobuddy also allows you to do some other very interesting things such as the calculation of salt weights for concentrated (1:100) stock solutions and the use of the "straight addition" method that allows you to calculate the weights of salts you need to add directly to a reservoir to arrive at certain concentration levels. Hydrobuddy also contains a "salt to formulation" feature which allows you to input a given weight of a salt or fertilizer and obtain the ppm values you would arrive to within your solution. This should be especially helpful for those of you looking to use hydrobuddy as a way to calculate the concentrations you get when you using specific weights of commercial fertilzers; it is also great if you want to manually tweak your calculation results if the calculator doesn't give you the salt proportions you desire.
-
-
The calculator also has a "nutrient log" feature that allows you to keep a record of how your hydroponic solution evolves, warning you when it is time to change solutions in recirculating systems or when pH swings are too wild. Hydrobuddy also allows you to use the "run to waste" option to login the pH and EC in-out measurements of your system to keep a record of how it evolves as a function of time. The nutrient log allows you to plot the evolution of your hydroponics system and quickly realize and correct any problems that might be happening.

If your water is very hard or if you have other problems such as high nitrate concentrations, hydrobuddy allows you to input your water quality parameters by pressing the "water quality" button, letting you take into account the hardness and quality of your water when preparing hydroponic solutions.

As you see my hydroponic calculator allows you to do many things easily which would definitely take a long time to do if done manually or with excel spreadsheets. The calculator allows you to quickly change formulations, used salts, custom fertilizers, etc without having to do a lot of effort. The checklist interface and the ability to save and load formulations makes the program ideal for those of you who do a lot of hydroponic growing with custom solutions but don't want to go through all the math or spreadsheet changes every time the formulation needs or when some nutrient sources need to be changes.

Thursday, August 19, 2010

My Hydroponic Calculator Tutorial : Saving and Loading Formulations and Recipes

One of the greatest features of my hydroponic nutrient calculator (which you can get here) is the ability to save and load recipes and formulations into the software. These options open up a lot of possibilities and allow you to quickly and effectively modify your previous work or get the information you need for the preparation of new reservoirs or stock solutions pretty quickly. However for many people the use of these features is not that straightforward, reason why this tutorial focuses on showing you how you can exactly use the different buttons to save and load different formulations and recipes.

First of all we need to make a clear distinction between what I call a "formulation" and what I call a "recipe". A formulation is simply the group of desired values of concentrations you want to achieve for the different nutrients within your final nutrient solution. A formulation does not deal with weights or specific salts but it mainly specifies the concentrations of the different nutrients expressed as elemental ppm values within the solution. A recipe - on the other hand - includes the results of a calculation for a specific formulation, reservoir volume and a specific set of salts, the recipe tells you exactly how much of each salt you need to add in a given volume of water to prepare a given final or stock solution. So the formulation contains merely the concentrations you want to achieve while the recipe contains the amounts of salts needed to weight to achieve a given concentration on a given reservoir or stock solution setup.
-

-
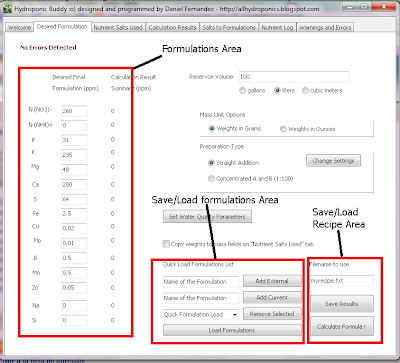
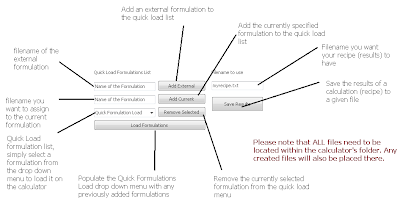
The image above shows you the areas within the calculator that deal with the inputting of the formulation, the saving/loading of formulations and the saving of recipes. After you specify a given formulation within the formulation area, you'll be able to save it using the "Add Current" button, which simply adds your formulation to the "quick load list" drop down menu right below it. Additionally you can add an external formulation by inputting the exact filename next to the "Add External" button and clicking this button. Remember that any external formulation files you want to add must be placed in the exact same folder as the hydroponic calculator's executable. Once you restart the program, the quick load list will be lost but you will be easily able to repopulate it using the "Load formulations" button which adds all the previously saved formulations to the quick load list.

One of the most useful features of this implementation is that you can easily share formulations with other people simply by sharing with them the files created by the calculator. When you use the "Add current" button, a file is created within the calculator's folder containing all the necessary information for the calculator to interpret the formulation. If you want to share your formulation just send this file to the person you want to share it with and tell him or her to load it using the "add external" button and field after adding the file to the calculator's folder.
-
-
Another very interesting feature is the ability to save recipes. Once you select the salts and do the calculations for a given nutrient solution formulation you will be able to save all the results using the "Save Results" button. This creates a file within the calculator's folder with all the necessary salt weights and instructions necessary to carry out the preparation. You can now print this file and use it when you are preparing the formulation or you can share it with others so that they will be able to reproduce your recipe with the exact same salt additions, volumes, etc.

As you see, the calculator provides you with a great set of features that allow you to easily save/load formulations and save and share recipes for hydroponic culture. Using the above mentioned features you should be able to save your formulations, save modifications of your formulations, quickly load formulations using the quick load menu, load external formulations onto the quick load list, save recipes and share your recipes and formulations with others around you who might also be interested in them. This is a great tool if you are sharing knowledge and the preparation of nutrients within a forum since others will be able to easily load and checkout your formulations and modifications without a lot of effort.

Wednesday, August 18, 2010

Cobalt in Hydroponics : Better or Worse ?

On yesterday's article we talked about silicon, one of the most beneficial non-essential nutrients you can use in your hydroponic crops. Although Silicon has proved to give marked benefits in peer-reviewed scientific studies, other elements are usually commented on being beneficial without a thorough investigation around current scientific literature. One of this particular cases is Co, with this element being often portrayed as a way to "increase flowering" or "increase fruiting", something which studies have shown to be false for several different plant species. On today's article we will talk about cobalt, its potential use in hydroponics, the conclusions of the studies that have been done and the potential danger involved with the use of cobalt in hydroponic solutions.

Cobalt is a transition metal from the same group as Rhodium and Iridium with chemical properties similar -yet quite different- to these other elements. As a chemist specialized in the area of organometallic chemistry - and especially through my work with this group - I have always enjoyed the chemistry of this element. Cobalt has many uses in pigments, radiotherapy, batteries, etc. Biologically its most important role comes as the metal center of the vitamin B12, cobalamine, which is essential to human life. Vitamin B12 is a large coordination complex in which Cobalt is tightly bound by an organic macrocyle, interestingly enough, this is one of the very few examples of a carbon-metal bond in nature with one of the axial ligands of cobalamin being a methyl organic group (in methylcobalamin at least).
-

-
So now that we know that cobalt is an essential part of a vitamin, it may seem obvious to use it as a minor constituent of our hydroponic formulations. However careful studies have shown that - if cobalt is needed by plants - it is only needed in the most minute quantities with concentrations of only 5 ppm already being markedly detrimental to plant growth (L.Gómez shows this effect in two studies in both lettuce and tomato). Other studies in the lower concentration range (>5 ppm) are contradictory and none show conclusive evidence that the additions of cobalt may be a good idea to increase plant yields in general.

Some people argue that cobalt is essential for some nitrogen fixing bacteria and that plants that rely heavily on these organisms might see improvements with cobalt additions not because of their "personal use" but because of the added benefit of having a healthy microbial population. Although these claims seem to "make sense" to a certain extent there haven't been any studies that confirm that this is true and that a strong and obvious effect exists due to the addition of cobalt to a nutrient solution. If anything current studies point to the fact that cobalt additions can be detrimental and that -if beneficial- it would only be in the smallest quantities which might already be present in your formulation through mineral impurities.

You have to take into account that most people and companies use fertilizer grade chemicals for the preparation of their hydroponic formulations (otherwise it is not cost effective). These chemicals are most of the time around a purity of 80-98% with most of them being in the 95-98% zone. Since some of these minerals hold cobalt as some of their natural impurities (copper and manganese salts for example) it is not surprising if adequate cobalt levels are already present in your solution through the mere impurities you introduce with your own formulations.

In the end it seems that cobalt additions are unnecessary and the person doing them runs the risk of decreasing their yields and possibly causing a toxic accumulation of this nutrient within the plant's system that may later be detrimental to the consumer's health. In this case the no-harm principle should apply, if a given additive is suspected of having detrimental effects then avoiding it is the best possible course of action while conclusive evidence of any positive effect (and the dose in which they are achieved) is revealed. Right now we know plants grow very well without additions of Co and we also know that even low concentrations of Co are not beneficial.

Tuesday, August 17, 2010

Silicon in Hydroponics : What Silicon is Good For and How it Should be Used

Certainly if you have been involved with hydroponics for a while or even if you have just started to research this awesome field you might already know that science has only discovered a handful of elements to be necessary for plant growth. From the first 92 elements of the periodic table, plants have only been proved to require C, H, O, N, K, P, S, Mg, Ca, Fe, B, Cu, Mo, Zn and Mn for their adequate growth. However it is certainly true that some other elements have proved to be beneficial - in certain quantities - for the development of several different crops. Such elements include Co, Si and Na. On today's article I am going to introduce you to Si, the way in which plants absorb it, how it should be administrated and the positive effects it is bound to have on your hydroponics plants.

Silicon is definitely one of the most abundant elements on the Earth's crust, forming - with aluminium - a very large portion of the earth's heavier elements. Silicon is mainly present in nature as the silicate ion (SiO3(2-)) forming solids with different degrees of polymerization known in the geological world as silicates. From these silicates we have a very large variety of minerals, from the aluminosilicates formed with aluminium to the very fine quartz particles (white sand) making up some of the most beautiful beaches throughout the world.

However when thinking about silicon and our plants we need to think about the way in which plants would be able to absorb this element. The minerals in which silicon is found are quite insoluble at room temperature and for this reason they cannot be absorbed efficiently by plants. If we want our plants to get some silicon we need to provide it in a form which is soluble and readily available for absorption. Such a form is sodium silicate (Na2SiO3) usually available as a pure solid or a solution in water called "liquid glass".
-
-

Studies in the field of hydroponics have shown that different types of cultivars such as wheat, tomatoes and cucumbers react positively to a moderate addition of silicate ions. When water glass is applied at a concentration of around 100pm (measured as SiO2), positive effects are found including increased weights of fruits, increased nutritional composition and - most importantly - a very important increase in the resistance to bacterial and fungal diseases. It seems to be that plants use the silicate ions to "line-up" their cell-walls offering a strong additional mineral resistance to any incoming pathogens that would want to get into their cells. Since plants lack and active immunological system, passive measurements like this which increase cell-wall strength are likely to be key to increase disease resistance for many crops.

However most people are quite careless about the way in which they apply this "liquid glass" since they are mostly unaware of the very sensitive equilibrium that takes place to maintain silicate ions in solution. Silicates are by definition very insoluble and the acidic pH in hydroponics is bound to cause some precipitation of different reaction products of this ion with other ionic species present within the hydroponics solution. The silicate ions can also form silicic acid and start to polymerize into complex macromolecular constructs. As a matter of fact, several studies do include information about the problems with drip systems, sprinklers, nozzles, etc, when using silicate ions since they tend to precipitate easily outside the hydroponic solution.

I would suggest - and so I have done with my own systems - that it is better to apply small quantities of silicate ions every 2-3 days, instead of applying a large amount during the beginning process. Applying a large amount of "liquid glass" (the 100ppm for example) would most likely end in most silicate falling out of solution and only a small part becoming available for plant absorption. I believe that the best thing to do is apply about 5ppm (measured as SiO2) every 2-3 days until the solution needs to be changed. This provides both higher stability and a better control over the solubility of this tricky ion within the hydroponic solution. Of course this is purely anecdotal evidence and no controlled study has yet shown this to be better. If you want to obtain results as those of the scientific literature available then applying the 100ppm on every reservoir change might be the wisest thing to do.

Sunday, August 15, 2010

The NPK Mistery - What Do These Numbers Mean and How are they Calculated ?

When you go into a forum about hobby hydroponic or soil growing one of the first things you will notice is that there is a big confusion regarding the meaning of the traditional NPK notation and the way these values are actually calculated. Some people believe this is supposed to be merely an N to P to K ratio measurement while others erroneously use ppm information directly to get their NPK fertilizer information. On today's post I want to talk about the real meaning and nature of the NPK measurement as it is used in traditional agriculture, how it is calculated and what it tells us about a fertilizer. (below a fertilizer made with pelletized nutrients in clay, traditionally described using the NPK ratio, this ratio is important because it is necessary to know how much is clay and how much is fertilizer)
-
-
The NPK measurement was invented as a way to gauge the quality and concentration of the 3 most important nutrients relevant in agriculture within a particular solid or liquid fertilizer. These three numbers represent the percentage composition by weight of any given fertilizer, telling us its percentage composition of N as nitrogen, K as K2O and P as P2O5. The reasons why K2O and P2O5 were used to represent potassium and phosphorous instead of referring to the simple quantities of these elements are that, first of all, the traditional analysis methods used to determine K and P give the values of the oxides in a more straightforward manner and second, the actual percentages of K and P when expressed as the oxides give "good ratios for the plants in soil" when the values are close to the value of N (making comparisons easier).

It is now important to note that the NPK reading must be calculated taking into account the weight of the given nutrient within the solution and the WHOLE weight of the fertilizer used. For example if you have a liquid concentrated fertilizer that has a composition of N = 12000 ppm, K = 20000 ppm and P = 4000 ppm which was prepared with 200g of added salts. The NPK ratio of this solution would be :

Total Solution Weight = 1000g (1L of water) + 200g (added salts)

N = 12000 ppm = 12000 mg/L = 12 g/L
K = 20000 ppm = 20000 mg/L = 20 g/L
P = 4000 ppm = 4000 mg/L = 4 g/L

Percentage of Nitrogen = (12g/1200g)*100 = 1%
Percentage of K as K2O5 = (20g/1200g)*1.2046 (K to K2O conversion factor)*100 = 2%
Percentage of P as P2O5 = (4g/1200g)*2.2914 (P to P2O5 conversion factor)*100 = 0.76%

The final NPK ratio is therefore 1-0.76-2. As you see you need to know the total weight of the solution and the elemental composition in order to be able to obtain this number. It should also be clear that the traditional NPK ratio is a PERCENTAGE COMPOSITION measurement and NOT a mere comparison of the ppm concentration ratios of N, P and K. Knowing a fertilizer's NPK not only allows you to know the ratio between these three elements but it also allows you to know how much of each one is contained within the solution so that the relative strength of different fertilizers can be calculated.

The traditional NPK ratio however has very limited use in hydroponic cultivation since it was invented to gauge the quality of soil intended fertilizers. Nonetheless it can be used to compare the relative strengths of different fertilizers and the ratio of the three main nutrients within them. However it should be clear that if you want to communicate a measurement that compares ppm concentration ratios you should not refer to this as an NPK measurement since this will cause confusion against the "traditional NPK" which was explained above. In hydroponics it would be easier to talk about ratios of ppm which should be expressed as N/K-P/K-1 for example which would give us the ratio of N to K and P to K without giving information about the percentage composition of the solution.

Friday, August 13, 2010

Truly Cleaning Your Hydroponic System : The Fenton Process and Chemistry

When most people clean their hydroponic systems they use a hypochloride or hydrogen peroxide wash that they think kills all the bacteria and potentially hazardous substances within their setup. However few people realize that - although the system is indeed sterilized - the bast amount of harmful substances and chemicals (even those coming from the plastics themselves) remain intact after the attack of either hypochloride or peroxide. For example, many of the harmful plasticizers and complexes used for the making of PVC and other polymers remain intact after a rigorous wash with these two cleaning agents. So what can we do to truly clean our hydroponic systems and get rid of all the bad things that may be quietly waiting their turn to get into our plants ? The answer comes in the form of a very well known process used world-wide to clean water supplies from toxic chemicals : the Fenton process.

In the late 19th century, Henry John Horstman Fenton discovered a chemical process which was able to oxidize the most resilient organic molecules and turn them into harmless chemicals. As a matter of fact, Fenton's process was so revolutionary that it sprouted a whole new area of research called Fenton chemistry in honor of its discoverer. What was this wonderful discovery ? Within the next few paragraphs you will learn what the Fenton reagent and process are all about and - most importantly - how this process can help you clean, I mean REALLY clean, your hydroponic system between growth cycles.
-

-
If you have been preparing your own hydroponic solutions and you have been using hydrogen peroxide then you already have most of the things you need to do some Fenton chemistry. The process basically works by adding a source of iron ions (they must NOT be chelated, like iron (II) sulfate) and hydrogen peroxide to a water solution. The iron ions then catalyze a series of reactions that generate powerful oxidizing radicals that destroy almost all harmful organic substances within your system. The iron ions are KEY to the Fenton process since they allow peroxide to generate this extremely reactive substances that are never present when peroxide exists on its own (reactions shown above). Research has found - for example - that phenol (a common chemical used as a model contaminant) remains unchanged in the presence of large concentrations of hydrogen peroxide while it is quickly destroyed in the presence of the Fenton reagent (Iron ions plus hydrogen peroxide). So what do you need to do ?

  • First of all you should add about 0.2g of Iron (II) sulfate per liter of solution you will be using to clean your system.
  • Then you should set your pH to a level between 3 and 3.5 using a STRONG non-organic acid such as nitric or sulfuric acid. You should NOT use citric, acetic or phosphoric acids since they lower the effectiveness of the Fenton reaction.
  • Add as much peroxide as you would add to regularly clean your system. About 70mL of 50% hydrogen peroxide for each liter of solution works very well.
  • Circulate the Fenton cleaning solution for at least 6 hours.
  • Wash your system with water until no Fenton solution remains.
It is key for you to use a non-chelated iron source since chelated iron sources such as FeEDTA or FeEDDHA do NOT work well since the chelate does not allow the iron ions to properly react and participate in the Fenton chemistry that should be going on. The pH adjustment step is also vital since a pH above 5 would cause the formation of FeOH3 instantly upon the addition of H2O2 with the subsequent catalytic decomposition of all the H2O2 by the iron hydroxide (this is NOT something we want !). After you use the Fenton reagent to clean your system you will be certain that a lot of the harmful organic molecules that were present have been destroyed and your system will now be able to play as a sterile and harmless host to your new set of beautiful plants.

Thursday, August 12, 2010

Iron Sources in Hydroponics : Which One is the Best ?

Definitely one of the most important problems dealing with the stability of hydroponic solutions is the availability of the iron (Fe+2 or Fe+3) ions. Since iron easily forms hydroxides and insoluble salts with other ions present in hydroponic media it becomes essential for us to provide iron in a way which is accessible to the plant and does not "come out" of the hydroponic solution through precipitation. Within the next few paragraphs I will talk to you about different iron sources available to hydroponic growers and which source is actually the best one we can use in hydroponic nutrient solutions. We will go through the different factors that make an iron source better or worse and finally we will be able to choose one as the ideal source for our nutrient needs.

What is the problem with iron ? The main problem we have with iron is that - unlike most other transition metal ions in hydroponic solutions - it is a very strong hard lewis acid which easily forms insoluble salts with many of the hard lewis bases within our hydroponic solutions. When iron is added to a nutrient solution in its "naked" form (for example when adding iron (II) sulfate) the ion easily reacts with carbonate, phosphate, citrate, oxalate, acetate or hydroxide ions to form insoluble compounds that make the iron effectively unavailable to our plants. To put it in simpler terms, iron ions have a chemical nature which is similar but opposite to that of many other constituents of our hydroponics solution meaning that when they meet together they form a "perfect match" that does not easily separate.

There is not only a problem with the higher inherent chemical match-making of iron with the anions present within the solution but we also have the problem that iron is always present at a much higher concentration than the other micronutrients. So even though some transition metals like copper would suffer from similar problems the fact is that they do not simply because of their much lower concentration (Fe is usually around 3-5 ppm while Cu is usually around 0.05-0.01 ppm).
-
-
The solution to this problem is actually easy and comes in the form of chelating agents that "wrap" around the iron ions and make them disappear to anions that may want to form stable salts with them. There are many of these chelating agents with the most commonly used being EDDHA, EDTA and DTPA. They are different due to the fact that their stability is different and their abilities to dissolve iron are also different. While all of them make sure iron stays within solution EDTA only allows this to happen until pH 5-6 while, DTPA takes it until about 8 and EDDHA to more than 9. The most stable iron complex is definitely FeEDDHA but this does not make it necessarily the best candidate for hydroponic growing.

The fact is that although EDDHA binds iron much more strongly it decomposes easier within the hydroponic solution than EDTA or DTPA (this is due to the fact that EDDHA is composed of several different isomers, some of which are not very stable), reason why this complex appears to be but is not the best solution for hydroponic nutrient solutions. The best compromise between stability and durability is earned by DTPA which gives us a very stable complex and a strong resistance to decomposition. So next time you are looking into getting a new complex for your Fe needs, try FeDTPA (this salt can also be used with my hydroponic calculator).

Wednesday, August 11, 2010

Chemical Buffers in Hydroponics : What is the Best, Cheapest Buffer

One of the biggest questions people ask when starting to grow hydroponic crops deals with the stabilization of pH and the use of chemical buffers to keep pH levels at acceptable ranges during long periods of time. The question is very relevant since changes in the pH of a nutrient solution can cause a lot of problems related to nutrient availability and having to add large quantities of acids or bases to correct the deviations is also not something plants will enjoy very much. What we need to do then is to keep pH levels within an acceptable range, for a period at least long enough to last a few weeks.

On previous posts I have talked about the way in which I do this using ion exchange resins but these can be too expensive or hard to find for most hydroponic growers out there. More over, chemical buffers are often much easier to use, get and apply although their actual mechanism of action is much less effective and much more aggressive than that of the ion exchange resins. A chemical buffer is mainly a substance which is added into your solution that distributes itself as different ionic species that can react either with acids or with bases at certain pH levels. The buffer however is also available for your plants to absorb and therefore we are limited to chemical buffers which are not phytotoxic (toxic to plants) and which allow us to control pH within the range we want.

From the very large library of chemical buffers available to the modern chemist, only a handful are suitable for their use in hydroponics and - even then - most of these are actually not practical in the sense that they are extremely expensive for the home grower. Certain organic buffers like MES offer extremely good results although they are hard to buy and very expensive, a reason why they are not used widely in hydroponic culture (this buffer is used mainly on hydroponic research where precision - and not cost - is the main determinant factor).

The buffers we are left with are then very simple organic and inorganic substances that have low phytotoxicity and some compatibility with the other ions present in our hydroponic setup. From these ions phosphate species, citrate species and carbonates are the most important ones we can use within our hydroponics setup. However we are limited by the actual concentration values of each we can use and for this reason we cannot have unlimited buffering capacity from these sources.

Which one is best ? We can actually carry out simulations to show us the pH vs acid-base addition for different hydroponic solution constitutions using mathematical equations. Running these simulations requires the solution of highly complex systems of equations which contain all the information relative to the chemical equilibrium of all the different existing ionic species. The below shown simulations were carried out using the Mathematica computer program (all solutions are assumed to be adjusted to an initial pH of 5.8 with a strong acid or base).
-
-
The blue curve represents the behavior of a poorly buffered hydroponic solution with only about 0.002M phosphate concentration (about 50 ppm of P). The red and yellow curves represent two solutions with increasing levels of carbonate showing us that if you are battling pH increases, having more carbonate will definitely help you deal with this. However it is also clear that carbonate concentrations at pH 5.8 are restricted to around 100 ppm since values above this are bound to cause toxicity due to the very large presence of the hydrogen carbonate ion. The green curve represents an increase in the amount of phosphate from 0.002 to 0.004M (about 100 ppm) with carbonate, showing us that phosphates are not good at buffering increases towards the upper side but they do increase buffering towards acid territory. Overall I also noticed that citrate concentration increases to the maximum threshold allowed by calcium citrate solubility did not afford a very good buffering effect with only a mild effect that prevented shifts towards the downside.

In the end, the conclusion seems to be that in a regular hydroponics system where pH increases generally happen towards the upside it is better to use carbonate as a buffering agent than to use citrate or phosphate although phosphate at its regular concentration in hydroponic does provide some buffering against pH moves (without phosphate increases are much more dramatic). For this reason I believe that a phosphate/carbonate buffer seems to be the best choice for most hydroponic growers, taking care to keep the concentrations at levels that do not cause precipitation or phytotoxicity problems.