Showing posts with label Article. Show all posts

Tuesday, September 21, 2010

A Step Forward : Moving from AllHydroponics to ScienceinHydroponics.com

Through the past few weeks I have been meditating about the current limitations of the blogger platform and how it makes my writing and customization options smaller and the look of my blog less professional. Due to the fact that I intend to start writing more and expanding this blog it becomes evident that I will need a much more powerful blog hosting platform and blogger seems to be limiting instead of helping my efforts in this regards. For this reason I have taken the decision to move my blog from its current blogspot home to a new self-hosted domain which I will use from now on to post new articles and releases of hydrobuddy.

This new website – scienceinhydroponics.com – will be the new home of my blogging effort in the area of hydroponic crop production and research. I will stop posting new articles on blogger and the old blogger website will start redirecting to the new wordpress based blog today. The idea of this new blog is to allow me to customize my website as much as I want and to be able to exploit the full potential of my web presence through the use of a self-hosted domain. In the future I hope that this move forward will make my content more professional and my efforts more worth-while. Future versions of hydrobuddy will now be released and maintained on the new wordpress blog and the previous blogger implementation will not be maintained anymore.

Of course if you have linked to my old blog the pages will not be deleted but they will cause automatic redirection towards my new domain. However the RSS feed will stop being updated so feel free to subscribe through my new blog’s RSS feed (links available on the top right corner of the blog). There are also now several buttons you can use in the bottom of each page to share the contents of the posts on facebook, twitter, etc and a Printer friendly function that will allow you to easily print my blog’s contents without any of the menus, etc. I hope that you will greatly enjoy this new blog which is a milestone achievement for me and the start of a new era for me as a much more professional blogger :o)

Saturday, September 11, 2010

Making Isotonic Solutions For Draining : Preparing Your Own - and better - Clearex

When growing hydroponic products it is common in the industry to do a final treatment before picking up the crop in which nutrients are removed from the hydroponic solutions. While in most cases this is achieved by passing RO water through the system it is true that passing water with a very low osmotic pressure can make the plants absorb larger amounts of water than what we would ideally want, disturbing the osmotic equilibrium established by the roots with the nutrient solution. An approach that has been used to solve this problem is the use of isotonic cleaning solutions - such as Clearex - which drain the hydroponic media from nutrients without subjecting the roots to the stress of an hypo-tonic solution (such as RO or distilled water).

On today's article I will teach you what the Clearex solution is supposed to achieve and how you can make your own (or even a better) solution to solve this final draining problem. First of all, removing nutrient from a hydroponic solutions is not so hard. Simply by running RO water through your system after draining the original solution you will remove most nutrients since these salts - contrary to what some companies tell you - are readily soluble and easily leave the media and roots when washed with RO water. The small problem when using RO water is that it is hypo-tonic with the roots, meaning that water will go into the roots to attempt to "lower" the concentration of the solutes within the plant's cells.
-
-
Depending on what you want to achieve with this final draining solution you may have a problem when using such an hypo-tonic solution. In crops where there is fruit production, using such a solution can cause problems such as the rupture of fruits' skin due to the higher rate of water absorption that takes place when plants are placed in a hypo-tonic media. In order to avoid these problems the best thing is to use an isotonic solution which has an osmotic pressure similar to the original nutrient solution.

Clearex achieves this simply by combining a few sugars to a concentration of about 4-6% in order to get to the point where the osmotic pressure of both solutions is similar. Getting regular table sugar an dissolving it in a ratio of 50g per liter of solution will achieve very similar results as those obtained with Clearex. However using sugars like this can have additional problems since sugars stimulate the development of fungi and bacteria within the root zones of the hydroponic plants.

In my opinion it would be possible to achieve better results by using an isotonic solution with a combination of salts and sugars in such a way that non-nutrient salts are used to provide an ionic content to the draining solution. Using a combination of NaCl, Sucrose and Sodium Hydrogen Carbonate to achieve a more balanced solution may provide better results when doing this type of draining procedures. Of course, this is based purely on my anecdotal evidence and an adequately controlled study would be needed to say anything conclusive for a particular plant specie.

In the end making these solutions is extremely simple and buying Clearex or such other solutions made for this purpose is an obvious waste of money. If you have obtained good results with solutions like these then you can simply make your own with simple sugars while it is possible that you could obtain results just as good as those by using RO water if your crop is not sensitive to hypo-tonic conditions. If you want to experiment a bit I would recommend using a solution with about 150 mg/L NaCl, 100 mg/L NaHCO3 (sodium bicarbonate) and 10g/L of glucose. Let me know if you get better, worse or similar results :o) (note that this is NOT a straight solution but a concentrated additive that should be used until the desired EC levels are reached)

Tuesday, August 24, 2010

Completely Passive, Non-Recirculating Hydroponic Systems : Yes, Its Possible

Generally when we think about growing plants hydroponically we think about complex setups with water pumps, air pumps, artificial lights, environmental control and greenhouses. However, it has been shown through many controlled experiments and experiences that hydroponics can be made in a much less fancy way, so simple in fact that pumps and other such appliances that consume electricity can be effectively and totally eliminated from the growing system without the need to lose a significant amount of crop quality or yield. On today's article I want to discuss some of these extremely simple setups and how you too can effectively and efficiently grow a hydroponic crop with low cost and absolutely no usage of electrical power.

Traditionally hydroponic systems - especially in developed countries - have been extremely dependent on electricity to make them work properly. Water pumps are used to carry fresh nutrient solution towards the plants and air pumps are used to keep the nutrient solution saturated with oxygen. However the truth is that such complicated setups are actually NOT necessary for successful hydroponic growth if adequate system design is actually made. People in less developed areas of the world such as South America, China and India have been experimenting with completely passive hydroponic setups to replace the more traditional energy intensive hydroponic growth and they have done tremendous progress to achieve this goal.

Many of you are probably already thinking about all the possible problems this might have. You might be thinking that this might work for small plants - like lettuce and some herbs - but never for nutrient hungry plants such as tomatoes, pumpkins, watermelons, etc. The fact is that these entirely passive non-recirculating systems work for ALL of these plants, providing adequate growing conditions and high yields typical of hydroponic systems. Right now it is not a matter of opinion or discussion if it can be done as MANY studies and controlled experiments already show this is a reality. You can see some clear examples here, here and here.

The questions now becomes, how is this possible and how can you do it ? The answers are pretty simple. Passive hydroponics without any electricity can be done for large or small plants given that the following conditions are met :
  • Enough space for roots is available
  • Enough nutrient solution is available for all the crop's life (or it is replenished)
  • Enough oxygen is available for the plant's roots
If this three conditions are met you will be able to build a passive hydroponic growing system that needs NO air or water pumps to give a good yield. How can you make such a system ? The systems that have given the best results up until now are those that follow a very simple design scheme. The plant is put in an absorbent nutrient media and placed to float or stand just above the initial nutrient solution level. The level of nutrient solution slowly falls down in the beginning (due to evaporation) and then quickly as the plants start to absorb water and nutrients. As the level of nutrient solution lowers the plant roots become exposed to layers of air from which they can absorb oxygen, allowing them to effectively absorb nutrients from the below stagnant solution without those roots dying.

Most people believe that if roots are submerged in an unaearated solution they will die but this is only true if the whole root system is submerged. If a good part of the system is given an "air buffer" from which to absorb oxygen and this space remains humid, the result is a system that can absorb nutrients from the unaerated solution and oxygen from the air buffer zone. This has in fact been shown to work in many cases (you can follow the links mentioned before for some examples).
-
-
For big plants such as cucumbers and tomatoes you would want to use a container filled with solid media to support the whole plant with the initial nutrient level being just a few inches below the surface while for smaller crops a "fixed top" idea might work much better. In the above image you can see both systems and how they evolve as the crops grow. For larger crops you might also want to replenish some solution every month so that the crops can get all the water and minerals they need if the actual container is not large enough to hold all the water the plant would use through its whole life cycle.

Without a doubt passive hydroponic systems like these ones will become extremely important in future world agriculture (especially in developing countries) since they are able to give us many of the wonderful advantages of hydroponics without the problem of complex electronic equipment, water, air pumps or an inherent dependency in the electric grid (which is not available everywhere in rural third world countries). Hopefully this information will also be useful for those looking to establish some passive and effortless hydroponic gardens to have fresh crops year round :o).

Monday, August 23, 2010

Improving Seed Germination : The Science of Seed Priming

When we want to produce large amounts of plants or simply when we want to start our gardens fast and get the most out of our purchases improving seed germination becomes a large priority. One of the largest concerns of world agriculture as well as the home grower is the decrease in germination time and increase in germination percentage since both of these factors can bring great benefits. Some seeds - especially some flowers and herbs - are often quite difficult to germinate and using certain techniques to increase the rate and speed in which they sprout has been the focus of a large amount of scientific research. On today's article I will be discussing the use of priming to decrease germination time, especially what priming is, what types are available and which ones you can use to decrease the germination time of those very difficult seeds.

To understand the concept of priming we first need a good grasp at the general concept of seed germination. A seed is a dormant embryo which carries within it the potential for a new plant's life. The seed is alive, yet has a very slow metabolic rate due to the low mobility of substances within the embryo's cells. This low metabolic rate allows the seed to remain alive, yet survive extremely long periods of time (some seeds can survive even hundreds of years) before actually sprouting into new plants.

Germination - which is the process in which we awaken the embryo - increases seed metabolism and toggles the massive reproduction that causes a new plant to grow. The main mechanism that triggers this process is simply liquid water. When water gets into the embryo and hydrates its cells, it speeds up metabolism and allows the process of cell division and growth to rapidly increase. However it is not always this simple to start this process since several impairments - both chemical and physical - can exist for successful germination.

Priming is simply a process done prior to conventional seed germination which allows the inhibiting mechanism to be broken and the metabolic speed increase to begin. There are several types of priming that can be done. A seed can be submerged in simple water (hydropriming), it can be soaked in a solution of a simple salt (halopriming) or it can be set in a non-ionic solution with high osmotic pressure (osmopriming). It is not entirely well established why one technique might work better than another but certainly some species tend to respond much more efficiently to one or another.
-
-
In general, priming offers the opportunity to almost always germinate seeds at much higher speeds without detrimental effects in germination percentages. For example, a two day treatment of parsley seeds with a PEG 6000 (PolyEthyleneGlycol) solution can reduce germination times substantially, from a few weeks to just a few days. Other seeds such as coriander might also benefit from similar treatments with PEG or with treatments with NaCl solutions. In general if you are looking to test priming on some difficult seeds you own you can try three small experiments to know which one works best for your particular seed variety and germination conditions. Do one experiment in which the seeds are simply soaked in water for 24 hours, another in which seeds are placed in a 200mg/L NaCl solution and another one in which the plants are submerged in a PEG 6000 20% solution, then let the seeds air-dry after the treatments. After comparing the results of these experiments with a control with no priming you will be able to see which priming technique is better for you and most effectively increases your seed germination rates.

To sum it up priming your seeds is a very efficient technique to increase the speed of germination without sacrificing germination rates. This methods are not very useful for seeds such as lettuce or tomato - which germinate easily - but they are invaluable for plants such as parsley, coriander or carrots which are generally much harder to germinate. If you have some seeds that have been giving you a hard time or seem to take ages to germinate then setting up some priming experiments might be the best thing to do.

Monday, June 7, 2010

Building Your Own High-Power LED Grow Lights for Hydroponics

You will often hear in the world of hydroponic growing that Light emitting diode (LED) lights simply do not work as well as the traditional HPS (high pressure sodium) or Tungsten Halide lamps when growing large plants. The truth is that this belief is centered around the fact that most of the commercially available LED fixtures are built with low-power cascade LEDs that simply do not give your plants enough light intensity to grow properly. The fact that people do not know how to distinguish one from the other, coupled with the problems of getting a genuine, high power LED lamp makes the use of LED fixtures in hydroponics limited and almost never considered a serious option for modern growers. On today's post I want to talk a little bit about how you can build your OWN high power LED lamp and how this way you can get a cheap, low-energy, highly-efficient device to make your plants grow.

The first thing you need to consider here is the amount of LEDs you will be using (the amount you will require for your plants) and the power supply you will need to feed those little hungry fellows. From my experience I can tell you that the lumens measurement of high power LEDs does not give you an accurate estimation of how many you need since LEDs have a highly centered light spectrum that is more accurately measure in micro Einsteins (the appropiate measurement unit for these devices). In this case I advice an empirical measurement of 5, 3W high power LEDs for each plant you wish to grow and 1 blue LED for every 10 red LEDs. (below you can see a picture of one of my LEDs, the LED was dimmed to get a better picture)
--
The second thing you want to do is buy the LEDs, just google red or blue 3W high power LED on ebay and you will find several chinese or US providers who will sell you these great artifacts for a small price. When you get your LEDs make sure you buy at least 3-5 more than what you will need since these LEDs are sensitive and they will burn easily if you wire them incorrectly. Since the power requirements of these LEDs are also pretty high they will get VERY hot (however much cooler than traditional lamps) and they will need to be mounted on aluminimum rails with at least one 6 inch fan for each 5 LEDs (or a BIG rail than can dissipate all the heat).

The next part - which is the most difficult - is the building of the power supply and voltage regulator side of the device. You can use a laptop supply to power up some LEDs but you need to calculate their power requirements so that you know how many you can power up for the power supply you will be using. A very good guide I used to create my LED assembly can be found here. Of course you should change the setup and LED number to fit your needs but the tutorial shows you exactly how you can choose the power supply, calculate LED needs and build the voltage regulator with a simple electronic circuit.
--
Finally, after I finished I hooked the power supply of my LEDs to a regular appliance timer which sets them on and off at certain times of the day. Making sure that my basil plants get enough light for their growth even when I am not at home. It is very worth noting that before I installed this LED fixture my basil plants were extremely leggy, etiolated and just dying. A few days after the LEDs where in place they started to grow like crazy :o) Do you have any questions, comments or suggestions ? Have you also built your own LED fixture ? Leave a comment below !

Wednesday, June 2, 2010

Growing a Hydroponic Garden Without a pH or EC meter

So you have decided you want to start a hydroponic garden but you do not want to use a pH or an EC meter. It is fairly common for people to feel this way when they are starting their own hydroponic gardening due to several reasons. Maybe you are not very familiar with the technical side of hydroponics, you don't want to get into all that stuff in the beggining or perhaps pH/EC meters are terribly hard to get or expensive where you live. Does this mean that without a pH and EC meter you won't be able to run a successful hydroponic venture ? No. On today's post I am going to talk to you about how you can grow hydroponic crops without a pH or EC meter and yet get good results, sometimes even better than people using all those technical gizmos :o).

As a chemist I think like a scientist and part of this way of thinking is the controlling of variables. I like to control pH and EC because I feel that this allows me to have a record of what is happening within my nutrient solution, without these measurements I would be "blind", so to speak. However when I was beginning my major I started my first hydroponic ventures with absolutely no control over pH or EC. I didn't do this because the cost of an EC/pH meter where I lived was prohibitive so I said, "what the hell" and went for it. I have to say that I got some very satisfying tomato crops after having some significant failures due to both rookie mistakes and disease. I managed to get full, 2 meter high tomato plants filled with delicious vibrant tomatoes and this happened without ever checking my pH or EC.

How did I manage to do this ? After time went by and I got an EC/pH meter, I started to monitor how my crop evolved with time to know what I should or should not do to improve my corp's yields. I found out that the pH of my crop increased steadily - and sometimes came near 8 - before I usually changed my nutrient solution. The EC oscillated widely but my reposition of the initial "level" of solution with water was enough to keep the EC at a good level. So if you want to be successful with hydroponic crops, it is not absolutely vital for you to have a pH or an EC meter, you just need to follow some simple guidelines to have a wonderful hydroponic crop.

1. Have one gallon of nutrient solution per plant. Having this volume of solution in your reservoir per plants allows you to have enough nutrients so that each plant will take a significant amount of time to absorb them. Having less solution is troublesome since your EC will change wildly and your nutrient solution changes will have to be more frequent. A one gallon per plant rule of thumb seems to be the best choice.

2. Add fresh water to recover the initial level of your solution . This is one of the easiest things to do. By adding fresh water -without any nutrients- to top off your reservoir to its initial level you will keep the EC near its initial value for the whole time. This simple technique ensures that your EC remains within rational levels and your plants stress-free.

3. Change your solution every 4 weeks. After 4 weeks, in a hydroponics system where there is one gallon per plant and the solution is continuously topped off (at least once a day) you will find that your plants have used about 40% of the nutrients at most (this is what I got from full production tomato plants and an atomic emission analysis of the nutrient solution). This means that your solution is now deprived of nutrients and it is time to use the solution to water your soil-garden and prepare everything again.

With this simple guidelines, anyone will be able to grow a hydroponic garden without using a pH or an EC meter. Of course, in the beginning you may find some problems while you find the adequate level of nutrients your plants need (if you do not prepare them yourself) but after a few trial and error runs you will be able to grow full hydroponics gardens without having to constantly monitor either pH or EC. Certainly, better results are achievable when you are monitoring these variables but it is possible to grow a beautiful hydroponics crop without the slightest monitoring of these aspects of a hydroponic nutrient solutions. People usually underestimate the ability of plants to adapt to changing conditions, something that they are able to do beautifully if you only follow the above advice. Do you have any advice or suggestions to help people grow without an EC or pH meter ? Feel free to leave a comment :o)

Thursday, February 26, 2009

Static Hydroponic Systems, Cons and Pros

There are several systems available today in which hydroponic crops can be grown. All hydroponic systems can be divided into two main categories defined either as static or dynamic systems. In hydroponic dynamic systems the solutions is recirculated at some point by using a water pump while static systems neglect the use of a pump or any other way in which water can be recirculated.

Static hydroponic systems can then be divided into two large categories, open and closed systems. In open systems, the nutrient solution that is given to the plants is never recovered and is "wasted" while in closed systems the solution is used for as long as it has the right chemical properties to feed the plants. For example, a lettuce raft system with no water recirculation is considered a static closed system (since the solution stays in contact with the plant until it is not right anymore) while a drip irrigation system with no pumps is considered an open system because new solution is given to the plants continuously. I will now discuss some of the pros and cons of hydroponic static systems, both open and closed.

Open Static Hydroponic System

The largest advantage of open static hydroponic systems is that the cost and infrastructure needed to pump solution back into the nutrient reservoir is neglected, this cost can be significant if solution volumes are small. Another important advantage is that the concentration of nutrients and pH of the nutrient solution does not need to be checked because fresh solution is continuously provided.

The main drawbacks of this systems have to do with the cost of the nutrient solution spent and the dumping of hydroponic nutrient solution in either soil, rivers, or the sewage system. Hydroponic nutrient solutions are very contaminating because of the easiness with which they cause algae blooms. The solution needs to be correctly processed in order to guarantee no contamination occurs, doing this will most often require water pumps, something which makes the first advantages of these systems void. The cost of the nutrient solution also becomes prohibitive. A regular plant consumes about half a gallon per hour in a drip irrigation system, wasting this amount of solution every hour in a commercial facility is unacceptable (reason why no commercial growers use open static hydroponic systems).

Closed Static Hydroponic System

This systems have the advantage of not being contaminating and using nutrient solutions as effectively as possible. They are the most economical systems that can be built and they provide ideal growing conditions for most plants with short life cycles. Larger plants like tomatoes do not benefit from having their roots wet all the time and require some sort of special design within the system.

The main disadvantages of these systems have to do with the necessity for water oxygenation (using air pumps) and the need for continuous monitoring of the nutrient solution in order to guarantee that ideal conditions are always met. This of course, is not very complicated and can be done with no problems. Most commercial growers will couple the ideal of a static system with a dynamic one in order to further improve it's effectiveness. For example, commercial lettuce raft growers often add water pumps in order to circulate, sterilize and oxygenate the water instead of using air pumps to do this.

As you can see, most static hydroponic systems are pretty primitive and are often confined to small home growers whose concern with efficiency and optimal conditions is not as strict as those of commercial growers. Almost all commercial growers use dynamic systems of some sort and that should also be the aim of home growers as these systems have shown to be more efficient and ecological albeit more expensive than static cultivation methods.(Below, a closed static hydroponic system for herb cultivation)
-

Thursday, February 19, 2009

Easy Seed Germination with Polyurethane Foam

Most hydroponic gardeners germinate their seeds using either a solid media such as perlite, vermiculite or coconut fibers or a woven media such as rock-wool. The first germination alternative has the problem of making transplant stress higher, while the second has the problem of being too expensive (for most hobby and commercial growers). With that in mind, I intend to explain on this post how to germinate your seeds using a cheap cube of polyurethane foam which is readily wet by the nutrient solution and generates almost no transplant stress when moving the plants.

The first step to germinate seeds in polyurethane foam is to buy a sheet of the adequate polyurethane. For this purpose, I use a polyurethane foam with a density of 0.015 grams per cubic centimeter. The next step is to cut the polyurethane foam in 1 inch by 1 inch by 1 inch cubes. After this is done, you have to make a cut with a sharp knife at one face of the foam cube (this is where the seed will be inserted).

Once your cube is cut and ready, you have to presoak it in water. Simply squeeze the cube under water and let it absorb all the liquid it can. Once you take it outside, do not squeeze it again since this will make the cube exchange the water it just absorbed for air.

Now simply deposit each seed inside a cube and place the cube in a tray for seed germination someplace where the appropriate conditions for the germination of your seeds are present. You can keep the seeds and the surface of the foam wet by misting water over the cubes everyday. Once the seeds germinate you can place them in your favorite hydroponic setup and the roots will grow out of the foam cube, into any solid media or nutrient solution. (below, an image of my germination setup ready for seed placing).
-

Salt Concentrations in Hydroponic Tomato Cultivation, More or Less ?

One of the most produced vegetables in hydroponic growing, both hobby and commercial, is the tomato. Because of this, and the very important place tomatoes have in world economy, many research efforts have been done towards the production of better quality crops. In hydroponics, much of this effort has been devoted towards the investigation of the optimum concentration levels of hydroponic tomato nutrient solutions. In particular, several researchers have studied how salt concentrations are associated with flavor in tomato crops.

Several peer reviewed studies have focused on this problem and many have drawn contradictory conclusions. Some studies suggest that higher EC levels are better for tomatoes while others sustain that it makes no difference in taste or nutrient composition but it decreases fruit size due to the higher osmotic pressure of the nutrient solution.

For example, a recent 2007 study, found out that tomatoes grown with an electrical conductivity of 2.3 and 4.5 dS/m had significantly different nutrient compositions and tastes with the tomatoes grown at 4.5 dS/m being far more tasteful and nutrient rich.

The difference seen amongst the studies is mainly because of the inherent composition of the nutrient solutions. Because different ions have different conductivities, some studies may show different results because of important changes in their nutrient compositions. Hence, even though conductivities are exactly the same, available ions to the plant are completely different. It can be seen that solutions that have higher potassium to nitrogen ratios and higher electrical conductivities prove to improve flavor consistently in hydroponic tomato crops.
-

Wednesday, February 18, 2009

Selenium in Hydroponic Growing of Lettuce

Hydroponic culture has a very good fame of giving optimal conditions for plant growth and nutrition. It is known that hydroponic crops grown with the best possible conditions can attain results far superior than those obtained with any form of soil gardening. However, the research community has just recently became aware that hydroponic growing may not only be used to provide the best conditions for growth but to enhance the plant's nutritional values in ways that were not possible before.

So how do we enhance plants beyond what can be done with traditional hydroponics ? One way is to add certain non essential nutrients to the solution that can make the plants become more nutrient rich. This for example, can be done with the addition of selenium to certain plant cultures, specially lettuce.

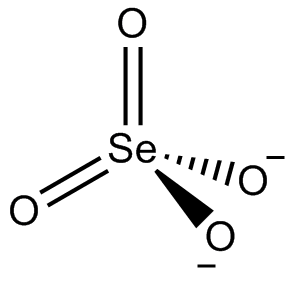
Selenium (Se) is a chemical element which is essential to human life. Selenate, the chemical form in which Selenium is absorbed, is a powerful anti oxidant whose daily recommended value is rarely attained with traditional diets. By adding Selenate to the nutrient solution of hydroponic lettuce crops the plant's Selenium content can be enhanced to supply the required daily values of Se.

Recent peer reviewed studies have shown that concentrations from 2 to 6 ppm of Selenate can increase the Selenium content of both lettuce and tomatoes as well as provide an important increase of other antioxidants in tomato crops. This is a clear example of how the inclusion of additional chemicals in the nutrient solution can enhance the nutritional quality of plants and make them go beyond what they would achieve under "optimum" natural conditions.(Below, the chemical structure of the Selenate anion)
-

Tuesday, February 17, 2009

Titanium Dioxide as a Disinfectant in Hydroponic Gardening

As I have said on previous posts, the problem of disinfection in hydroponic gardening continues to be a main issue in the area of soil less culture. Although there are many chemical solutions such as sodium hydrochloride and hydrogen peroxide, they continue to be non discriminant oxidants with the potential to damage roots and more importantly beneficial symbiotic microorganisms. Therefore, the use of chemical disinfectants takes away the possibility of using applications of beneficial organisms to boost crop yields.

Non chemical ways of disinfecting nutrient solutions do exists but are most of the time extremely expensive and only viable to large commercial growers. Examples of these are UV and ozone sterilization. Both processes are more friendly than chemical disinfectants and are friendly with root beneficial microorganisms, their only drawback is the high cost and difficulty of installation.

Nonetheless there is another potential way of sterilizing nutrient solutions which is both economically feasible for small growers and friendly with beneficial microorganisms that interact directly with plant roots. This new sterilization mechanism uses titanium dioxide as a mean of fighting pathogens inside the hydroponic nutrient solution.

Titanium dioxide is an innocuous, insoluble solid which is vastly used in the food and paint industry. Besides this, antase, a specific crystalline form of this material, has very interesting photocatalytic properties. For example, when irradiated with UV rays (the sun's being enough) antase is able to decompose organic matter into non harmful chemicals. It has been widely studied as a means of replacing hypochloride in water treatment plants and now offers a great way to sterilize nutrient solutions in hydroponic growing.

Degussa P25, an anatase containing nano crystalline commercial form of titanium dioxide, is very cheap and adequate for it's use as a sterilizer in hydroponic growing. Simply, the solution is passed through a shallow open container that has several tiles of cheap glass covered with a small layer of sinthered Degussa P25. This sterilizer can eliminate microorganism spores, bacteria, etc, from the nutrient solution while keeping costs and chemical disinfection down to a minimum. This is something I am going to try in the near future so stay tuned to see my results ! (below, a SEM image of titanium dioxide nano particles)
-

Monday, February 16, 2009

Checking the pH of your Hydroponic System, The Easy Way !

Growers often think that they need to buy pH meters in order to accurately control the pH level of their hydroponic nutrient solution. Actually, there are a couple of ways in which pH can be readily monitored without any digital equipment. One of the cheapest ways in which this can be done is through the use of an acid base indicator.

An acid base indicator is a substance whose protonated and deprotonated molecular forms have different electronic structures with different spectroscopic properties. Therefore, an acid base indicator changes it's color according to the pH value of the solution and this color change can tell us if the pH of our nutrient solution is right or wrong.

Every indicator has it's own characteristic proton affinity which means that it changes at a different pH value. Since the optimal pH in hydroponic growing for most species is between 5.5 and 6.5, we will use an indicator that changes around this value and can tell us if the nutrient solution differs from the ideal setup.

The indicator which best suites our needs is Chlorophenol Red. This substance changes color from yellow (pH 4.8) to red (6.4) (wikipedia is wrong about it changing to violet !), at the pH of our interest, which is 5.5-6.0, the indicator is orange. You can buy an already prepared solution of the indicator ready for testing here. A 100mL solution will allow you to perform thousands of tests at 1/10th of the cost of a regular pH meter.

In order to test the pH, add about two tablespoons of the nutrient solution inside a transparent glass, then add two or three drops of the indicator, mix and watch the results. If the indicator is either red or yellow, you are off the desired value. If the solution turns orange, your nutrient solution's pH is just about right ! (Below, the color change of the indicator as a function of pH, notice that the orange region is precisely around 5.5-6.0 .
-

Saturday, February 14, 2009

Building a Cheap System to Grow Hydroponic Lettuce

In an earlier post, I talked about a static hydroponic lettuce system that needed no aeration or recirculation and worked by providing an air space between the nutrient solution and the plants. Today I am going to explain how to build this very simple system from cheap materials. These are the things you will need :

- 8 Nails - 2 inches (5cm) long
- 40 Nails - 1 inch (2.5cm) long
- 4 wooden boards - 100 x 10 x 2cm
- Plastic lining (greenhouse polyethylene) - 1.20m x 1.20m
- Knife
- Styrofoam board - 100 x 100 x 2 cm
- Silicon Paste Sealant
- 1/4 gallon white latex paint
- painting brush

The first thing you need to do is nail the boards together forming a 1 x 1m frame. To do this I used 8 large Nails.
-
-
After the boards are nailed together (like it is shown above) paint the outside using white latex paint. This provides protection for the wood from water, light, bacterial and fungal damage. Now line the frame with the plastic, nailing it on the borders using small nails.
-
-
Your system should look like the one shown above. After this part, we need to build the cover of the system that will hold the lettuce plants. Cut 42 2x2 cm holes on your Styrofoam board in a 6 x 7 fashion, keeping a distance of 12 cm between holes. This is shown below.
---
Now you need to glue this Styrofoam piece on top of the frame you built before. Do this using silicon paste, taking care to afford a good seal along the whole structure. This will prevent light from reaching the nutrient solution. The holes are fit to accommodate 42 plants (but you may do less holes if you desire to nurture less plants) germinated in polyurethane foam. Later this week I will continue to explain how plants need to be germinated and transplanted in order to use this system and how the nutrient solution is used and replaced. Below, a picture of the finished system (total cost for me, 25 USD).
-

Friday, February 13, 2009

My pH Balancing System for Hydroponic Growing

In the past few days, several people have asked me how to use my carbonate/citrate buffering system as a means to control the pH of their nutrient solutions. For this reason, I decided to write a post which explains the simple way in which my buffering system can be prepared and a little more about how it works and what you can expect from it.

A pH buffer's function is to provide reaction "alternatives" for strong acids and bases when they contact the nutrient solution. These acid or basic substances generally react with water and this changes the value of pH. When a buffer is present, they react with the buffering molecules instead of water. This of course, makes pH remain approximately constant. Since the generation of species can be perfectly controlled and predicted by the use of mathematical methods, we can create very good buffering system by "experimenting" with different substances using a computer, as I mentioned in an earlier post.

As a result of my simulations I concluded that a mixture of citric acid/carbonate acts as a good buffer in hydroponics both towards the addition of acids and bases. The actual species involved are citrate and the bicarbonate ion, the bicarbonate ion reacts with acids, providing basic pH buffering, while the citrate reacts with acids providing an acid range buffering effect.

It is very easy to use this system by using your regular pH meter. Prepare your nutrient solution as usual, at the end, add 5g of citric acid for 500 liters of solution (this will acidify the pH of your solution a lot). Now, take back the pH to the value you want (5.8 to 6.2) by adding potassium carbonate. It is important not to use bicarbonate as this will react quickly with citric acid to form carbonic acid and then carbon dioxide (which will leave as a gas !). Also make sure you add both chemicals previously dissolved in water to afford quick chemical equilibrium achievement inside the solution.

By using this method you will have a nutrient solution that is perfectly buffered at your desired pH and that will remain at that pH value for a good amount of time. This of course, depending on the solution's volume and the type and number of plants you grow with it. (below, the distribution of species diagram or the carbonate family)
-

Thursday, February 12, 2009

One Plant Hydroponic System, Wick Growing

Most hydroponic systems today are a fairly complicated combination of holding materials, irrigation systems, aeration pumps, etc. For most people wanting to grow a single plant in hydroponics it has become quiet impossible to figure out where to find a cheap system to do so.

One of the cheapest systems available for hydroponic gardening of small plants (ideal for experimentation and school projects) is the hydroponic wick nutrient system. This system uses an absorbent fiber to carry on nutrient solution by capillary action towards the plant which usually rests above it. Wick systems are very easily built and are a very good fit for the growing of small plants.

Medium sized and large sized plants start to have problems with hydroponic wick systems due to the inherent capillary flow limitations that physics impose on the flow of nutrient solution. The absorbent fibers on capillary systems are also often clogged because of nutrient salt buildup (due to water evaporation because of the large surface area of the fibers). Water evaporation increases the concentration of salts along the fiber and starts to precipitate insoluble calcium and other metal phosphates. These are very hard to redissolve and often cause the system to stop working.

However, as I said before, wick systems such as the one built here are very appropriate for experimentation, growing a single hydroponic plant or doing school projects. The system is very easy and cheap to build.(below, a photograph of plants being grown on this system, note that they are very etiolated due to lack of proper lighting)
-

Wednesday, February 11, 2009

Outdoor Hydroponics, Growing Without a Greenhouse

Most hydroponic gardening techniques demand strict control over the growing media and ambient variables in order to have a crop in optimum conditions. However, most small hobby and commercial hydroponic gardeners do not have the budget necessary to build a greenhouse and need to have their systems exposed to the elements. This is why I decided to write a post about growing hydroponic plants in outdoor conditions, to show growers that hydroponics can be grown outside if adequate precautions are taken.

So what is the problem with the outdoors ? Well, the main problems are temperature changes, rain, haze, snow and excess light. Plants grown outside a greenhouse do not have any protection against direct sun, rain, haze or snow and are therefore most likely to be damaged by the elements. This of course, does not mean that the crops cannot be taken outside.

In countries where there are four seasons (and winter has snow), care needs to be taken not to grow any plants during the winter, because snow will most likely kill all the crops. furthermore, low temperatures are likely to freeze the nutrient solution, something that can be a really bad problem in a hydroponic garden.

Another precaution that needs to be taken is to be specially watchful of the levels of EC in the hydroponics garden. In this special case, nutrients need to added in order to compensate for dilutions caused by rain. Electrical conductivity levels need to be taken before and after a rain storm in order to know the change in EC and return it to normal after. Note that this is a special case, normally nutrients should never be added to a solution which was naturally depleted by the plants. Please read the EC FAQ post for more information about this.

Another important thing is that plants should be protected from excessive evaporation by using hydro-gels. These polymers are applied over the plants root ball and effectively retain moisture for the plant so that possible stress from excessive evaporation becomes minimal. If the sun is too strong, additional measures such as nutrient reservoir cooling (with ice for example) have to be done in order to maintain adequate temperatures around the root zone.

It is clear that hydroponic crops can be grown outside but growers have to take special precautions with this area of hydroponics and commercial growers using this technique should have the losing of one crop a year in their budget (for crops such as lettuces) due to ambient conditions ruining their growth. (below, an image from a special program done by the UN to help poor people use hydroponics as a stable source of income)
-

Monday, February 9, 2009

Growing Citrus Trees in a Hydroponic Garden

While hydroponic gardening is most often done with plants like tomatoes, lettuce and bell pepper, it is well known that the hydroponic growing technique can be applied to a large variety of plants with different degrees of success. One type of plant that is an all time grower favorite is the citrus tree. Plants such as orange, lemon and mandarin (called citric because of their high citric acid content) can be grown effectively in a hydroponic garden.

Before you start your quest for a hydroponic citrus tree, beware that this type of plant demands somewhat warm weather and high amounts of light. These plants are not very good at indoor growing unless some LED growing lamps are used to complement lightning (although high pressure sodium and halide lamps can also be used).

Once you decide to grow a citrus tree the first step is to either find a suitable candidate from a nursery or grow your own from seed. If you want to grow from seed, beware that it will take the plant 3 to 5 years in order to start bearing fruit. If this is unacceptable, find a plant at a local nursery that has the age you require. If you are growing from seeds, soak the seeds inside a napkin for 2 days and then remove the external seed coating. This guarantees effective germination once the seed is planted.

For the best results, I recommend using a 5 gallon container filled with rice husk, perlite or vermiculite fitted with adequate tubing at the bottom for nutrient solution evacuation. I recommend installing a drip irrigation system with at least 3 drip emitters per citrus tree you planted.

As for the nutrient solution, I recommend using a Hoagland solution, first at half strength and then at full strength as the plant starts to grow. Your hydroponic citrus tree will not probably grow as big as an actual citrus tree but will bear fruit of normal size and sometimes even in the same quantities. Since your tree is in a hydroponics system, it will (if the solution is taken care of) never have to face any iron or manganese defficiencies common to soil grown citrus trees. Sometime in the next month I will publish a detailed how to on the construction of the hydroponic system itself.
-

Sunday, February 8, 2009

Beneficial Fungi in Hydroponic Gardening

In common hydroponic culture, the growing media and the hydroponic nutrient solution are kept sterile in order to guarantee the absence of malicious plant pathogens. This however, changes the root environment dramatically and places plant roots in a media which is totally inert and different from the media in which they evolved, soil.

However, hydroponic gardening offers an important advantage in that adequate beneficial microorganisms can be cultured with our hydroponic plants, making the root environment change towards a much more soil-like beneficial media whith stimulated nutrient absorption, prevents pathogens and increases growth.

Amongst all the microorganisms that can be introduced into hydroponic media, none are as beneficial as the fungi commonly known as mycorrhiza. This term refers to fungi that create important symbiotic bonds with the plant's roots, activating the plant's internal defense mechanisms and boosting it's nutrient uptake capabilities by using the fungus's hyphae as nutrient uptake vehicles with a much higher surface are than common plant roots.

In practice, I have introduced Trichoderma species of fungi into my hydroponic solution every crop for the past 2 years with very good results. Trichoderma visibly stimulate the plant, making it vigorous and more productive than a traditional hydroponic plant. The fungi also increase the plant's ability to assimilate phosphorous, something which is a problem where I live due to low ambient temperatures (which hinder P uptake). In order to use Trichoderma efficently in your hydroponic solution you should lower the amount of phosphorous under 40 ppm because higher amounts of this element inhibit the fungi's development.

With this in mind I hope that all of you who have considered biological help in your hydroponic garden will start using these incredible microorganisms which are very good at helping your plants develop and maintain an adequate level of productivity. (Below a picture that shows the difference between plants with and without beneficial Trichoderma spp fungi)
-

Saturday, February 7, 2009

The NFT Hydroponic Growing System

In the last 50 years, many hydroponic systems have been developed in order to make crop cultivation easier, cheaper, faster and denser. Amongst the systems that have been developed, one of the hydroponic systems which has caught the most attention and is used more frequently is the so called NFT (Nutrient Film Technique) system.

The system's operation principles are quiet simple. A PVC (or or other polymer) rain gutter is placed on an aluminum frame with a certain inclination, plants are placed in small containers introduced inside the gutter and a nutrient solution is sprayed at the most elevated side of the gutter. The spraying forms a thin film on the gutter's bottom and flows towards the other end due to the slope.

The fact that the NFT system allows most of the plant's root system to remain outside the nutrient solution is the main reason for it's success. Throughout a lot of research, it has been found that plants just need to be "barely" in contact with the nutrient solution. Plant's seem to greatly benefit from their roots abosrbing oxygen from open air and taking just the little amount of necessary nutrients they need by a small contact with nutrient solutions.

The NFT system is great for crop cultivation and is one of the most efficient systems for the growing of crops such as basil, lettuce, spinach and cabbage. However it does have some disadvantages such as gutter length limitations due to nutrient and temperature changes (usually gutters are never more than 15 feet long), of course they also have the strong disadvantage of much higher costs (fue to the gutters being expensive) and lower planting densities (due to the spaces needed between gutters to allow personel). Nonetheless, many companies growing NFT systems have been able to make "foldable" gutters which allow automatic recollection of lettuce, transplanting and sterilization.

In conclusion, one could say that the NFT system is one of the best hydroponc growing systems that have been developed due to the fact that it allows greater oxygen and nutrient absortion. In fact, the hydroponic nutrient film technique is one of the most used systems for lettuce cultivation.
-

Friday, February 6, 2009

Disinfecting your Hydroponic Solution with Hypochlorite

As I talked about in a previous post, the disinfection problem in hydroponics is very important as many pathogenic microorganisms as well as algae develop through the course of any hydroponic gardening attempt. Hydrogen peroxide, as I said earlier, is a very good disinfectant with incredible properties but most of the time it is not used because of it's high cost.

Amongst one of the most common disinfectants available we find sodium hypochlorite. This chemical substance with formula NaClO is a good disinfectant because it oxidizes organic matter producing Cl2 which then further oxidizes organic matter tu produce Cl(-). As you can see, the several steps available for oxidation as well as this compound's innate reactivity make it one of the best and cheapest disinfectants available today. This is the reason why sodium hypochlorite solutions have been used for a long time and now have commercial names, such as Clorox.

In hydroponics, sodium hypochlorite solutions are commonly used to sterilize a hydroponic system prior to use or in between different crops. However, this does not achieve the purpose of maintaining the nutrient solution sterile throughout the whole gardening cycle.

In order to achieve this in a very simple way (for the home hyroponic and commercial gardeners) several peer reviewed papers have studied the effect of hypochlorite ions on different plants and at different levels of concentration. In general, it has been found that concentrations of hypochlorite of 5.5 ppm offer good protection agains microorganisms without affecting the crop qualities.

If you do not have any industrial grade hypochlorite you can still achieve this concentration by applying 0.1mL of Clorox (check that it is less than 6% hypochlorite, usually 5.25%) per liter of nutrient solution. This can be easily measured and applied for small systems with the aid of a 1mL syringe as the ones diabetes patiens use for insulin (these syringes can be easily purchased at any pharmacy). Remember to try this with a small batch of plants before applying it over your whole garden to ensure compatibility with your particular nutrient solution.
-